30 DIY Projects From Scrap Wood


If you are anything like me, I have my hoard of leftover wood and scrap pieces. For some reason, I have a hard time throwing them out! Serious. Like 3 times a year, my husband goes through the garage and does a full clean out. Each and every time he freaks out at my scrap hoard. ha! And each and every time, I just move it to a different place so it doesn't bug him as much. I really do go through the pieces constantly and pull out things I need. It totally beats have to go to the home store for a 5" piece! Am I right? ...I know I am :) Well, now that the stay at home orders are in place, like many of you, I'm starting to reach into that scrap pile of wood again to find more fun projects to create. I have one up my sleeve that I will be sharing with you next week! 

For now, I went through my archives and found a whoooole bunch of projects you can easily make with scrap wood pieces!  I think there are easily 30 projects here. Just hope you have some stain and paint on hand to finish them!

DIY Floating Shelves
 http://www.thriftyandchic.com/2016/08/diy-floating-shelves-and-bathroom-update.html
DIY Vintage-style Cutting Board
http://www.thriftyandchic.com/2019/06/diy-vintage-style-cutting-board.html
DIY Patio Umbrella Stand
http://www.thriftyandchic.com/2019/05/diy-patio-umbrella-stand-hide-ugly.html
 DIY Sunburst Mirror
http://www.thriftyandchic.com/2011/07/diy-wood-sunburst-mirror.html
 DIY Cathedral Window Frame
http://www.thriftyandchic.com/2018/04/diy-cathedral-window-frame-for-less.html
DIY Farmhouse Corbels
http://www.thriftyandchic.com/2018/02/diy-farmhouse-style-wood-corbels.html

DIY Sliding Perpetual Calendar
http://www.thriftyandchic.com/2018/04/diy-sliding-perpetual-calendar.html
 DIY Shiplap Farmhouse Clock
http://www.thriftyandchic.com/2018/02/diy-shiplap-wood-farmhouse-clock.html
 DIY Farmhouse Ladder
http://www.thriftyandchic.com/2017/02/diy-farmhouse-blanket-ladder-for-5.html
 DIY Framed Shiplap Tutorial
http://www.thriftyandchic.com/2017/07/diy-framed-shiplap-tutorial.html
 DIY Coffee Cup Display Rack
http://www.thriftyandchic.com/2017/02/diy-coffee-cup-display-rack.html
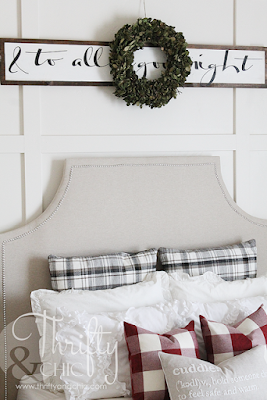
 DIY Wood Farmhouse Signs
http://www.thriftyandchic.com/2016/12/diy-wood-christmas-sign-no-stenciling.html
 DIY Farmhouse Style Hanging Baskets on Reclaimed Wood.
http://www.thriftyandchic.com/2016/08/diy-farmhouse-style-hanging-wire.html
DIY Oversized Wood Dice
http://www.thriftyandchic.com/2016/06/diy-oversized-wood-dice.html
 DIY Floor to Ceiling Wood Headboard.
http://www.thriftyandchic.com/2014/06/diy-floor-to-ceiling-wood-headboard.html
DIY Faux Cement Tiles
http://www.thriftyandchic.com/2019/01/diy-faux-cement-tiles-for-decor.html
 DIY Wood Vase with Mason Jars
http://www.thriftyandchic.com/2016/05/diy-mason-jar-and-wood-vase-centerpiece.html
 DIY Wooden Caddy
http://www.thriftyandchic.com/2015/07/diy-wooden-caddy-with-galvanized-metal.html
 Reclaimed Wood Lantern Hanger
http://www.thriftyandchic.com/2015/05/reclaimed-wood-lantern-hanger.html
DIY Side Table Tutorial
http://www.thriftyandchic.com/2013/11/diy-side-table-tutorial.html
DIY Wood Lantern Tutorial
http://www.thriftyandchic.com/2013/10/diy-lantern-shabby-chic-style.html
 DIY Scalloped Wood Frame
http://www.thriftyandchic.com/2012/11/diy-scalloped-frame.html
 DIY Round Side Table Tutorial
http://www.thriftyandchic.com/2012/11/how-to-build-side-table.html

DIY Pottery Barn Knockoff Small Chalkboard
http://www.thriftyandchic.com/2012/07/project-knock-off-pottery-barn.html
 Jewelry Wall Display and Other Ideas On Displaying Jewelry.


http://www.thriftyandchic.com/2012/06/simple-jewelry-displays.html
 DIY Crate Wall Shelves


http://www.thriftyandchic.com/2012/04/crate-shelves.html
 DIY Firewood Holder


http://www.thriftyandchic.com/2011/09/chicken-wire-firewood-holder.html
 DIY Fireplace Surround (Yep, there's some ugly tile underneath that!)
http://www.thriftyandchic.com/2011/09/diy-fireplace-surround.html
 Scrap Wood Wire Tray
http://www.thriftyandchic.com/2011/05/scrap-wood-wire-tray.html
Scrap Wood Wreath
http://www.thriftyandchic.com/2019/03/diy-scrap-wood-spring-wreath.html

 PIN FOR LATER:
 DIY scrap wood projects. Projects to do at home during quarantine. DIY wood decor. DIY home decor. How to use scrap wood. What to do with your scrap wood pile.

 DIY scrap wood projects. Projects to do at home during quarantine. DIY wood decor. DIY home decor. How to use scrap wood. What to do with your scrap wood pile.

 DIY scrap wood projects. Projects to do at home during quarantine. DIY wood decor. DIY home decor. How to use scrap wood. What to do with your scrap wood pile.

DIY Patio Umbrella Stand (Hide The Ugly!)


On the few days that the weather has cooperated...and I mean very few...I've had the chance to spruce up my patio...which usually follows by me sprinting inside to hide from the wind, rain, and lightning.  My patio became pretty drab over the winter. So, I decided to change it up a bit starting with this little project...my patio umbrella stand. Even though this was just on a whim project, and literally took me 10 minutes to do, I felt like it made a huge impact on this area.
 This is how it used to look. It's heavy as heck and made of granite. I think 40 or 50 pounds, and wouldn't you know that our winds still blow the thing over. Anyway, I got this one because it was the most sturdy one out there. I never cared for how it looked though.
 So, I decided to create a little box for it. My first step was to use 4 pieces of 2x4s, and case it in. The diameter of this stand is 18", so my 2x4s were two at 22" and two at 19". The 19" pieces sat inside the 22" pieces. I secured these with 2 1/2" screws.
 I then cut some scrap would 1x4s to go over the top. These were all cut at 22". The middle section was a little smaller than a 1x4, so I did some digging and found some 1x3s. I cut these to fit pretty close to the vertical part of the stand, but enough that it could come off if needed.
 Since these 1x3 pieces were only going to be connected on one end each, to prevent them from sagging, I added a scrap piece of 1x3 to the bottom portion so that it can rest on the granite. I secured all the top pieces of wood with 1 1/4" nails.
I then stained the entire piece Dark Walnut by Minwax.
 Besides hiding a complete eyesore, this gives a great extra place to add some patio decor. I was really have a problem with placement of that bamboo lantern, and now it fits on here perfectly!
 Here's a little sneak peak at more of the patio which I'll be sharing with you all next week....if it ever does stop raining. I'm telling you, 40 degrees in May is not cool... I feel like we are in the beginning of March. I want my hot temps back! So, weather depending...I'll show you the rest of this area with sources :) I also have big plans for the opposite side of this patio, which I can't wait to get started on!
PIN FOR LATER:

DIY Rustic X Console Table

This post contains affiliate links.

About a year ago, my mom made a big change and decided to move closer to me. She built a house from scratch in a beautiful area of our town. The only problem? She moved from a house full of character to a builder grade home...one in hundreds, instead of one of one. I promised her that we will build character into her new house. So, slowly, I've been building pieces and adding character over these past several months. We have lots more to do and many rooms to finish, but it's happening. That being said, I'll be sharing lots of projects going on in her house with you. The first of which is this DIY wood x console table for her entry way...which was actually a surprise present I made for her birthday. It was so much fun having her walk in and see it.

 The hallway for her entry is so long and crazy wide. I thought of multiple ways to furnish it, but ultimately came up with this 8' long and 17" wide table. She was in desperate need of storage spaces. With this open concept plan, and quite a bit smaller house, she lost storage space along with storage pieces she once used. So, my requirement was to build something to take up this space that offers storage and adds character.

I decided to go with this plan from Ana White(full tutorial here). I made the length a little bit longer, but the steps are all the same. I'll share below with how I got the white wash weathered wood finish.

First step in building this table was to create the frame. Using 2x2s and 2x4s, I attached them together using pocket hole screws.
The next step was to secure the bottom and middle shelves. These are 1x12 boards.
 They were secured to one frame first using wood glue and pocket hole screws.
Then I secured to the other frame in the same manner. This is a look at it upside down. I added the supports with the 2x4s on the top and bottom of each side, and a 2x2 along the middle shelves to the supporting 2x4 legs.
 Next was adding the "X". If I told you this part was easy, I'd be lying. It took me longer to make sure these were correct than it took me to build the entire piece. After many....many attempts, I settled. :) I think they turned out alright in the end.
 I then added the top using 2x6 at 8' long.
 Now for the finish. This is probably one of my favorite finishes out of all of the pieces I have done. I white washed the wood using interior latex paint in satin. The exact paint is Swiss Coffee by Behr. I made sure to keep a lot of the wood grain showing and only did one light coat. I did make it heavier in some areas and not as much in others.


 I then took Minwax's Classic Grey and went over the entire piece using some old cloths. If it was heavier in areas that I wished, I quickly wiped it away to let the white show through a little more. At the end, I then wiped it entirely down with a clean cloth, making sure to get up any unabsorbed stain.
 And that's it! It gave it a beautiful natural looking weathered look.
 I think the "X" and the weathered look gave this piece the perfect character for this space.

 You can see here how long the entryway is....and I'm not even out the door in this picture. There's still a lot of space behind me. We have lots of plans for these walls, which include.....board and batten. Who would have guessed? Ha!
 Styling this was fun...and easy! I knew we needed storage, hidden storage. That came in the form of these baskets from Home Goods.
We found this beautiful mirror from Home Goods also and flanked the sides with the blue glass vase and lamp. Added extra height to the left side with the candlesticks from Hobby Lobby. And of course, I added my go to faux plants and books! 

 I am so excited to get going on this floor to ceiling board and batten. I think it's really going to add such an impact in here! 
Here's a good view of this space before she moved in. We decided to go with all white walls to save on cost...mainly knowing we for sure wanted the ceilings to be white and in order to make the ceilings white, either all the walls also needed to be white or we needed to pay for 3 tone paint. I figured white was the way to go. You can always go and add simple accent walls of colors. That's a whole lot easier than trying to paint an entire house's ceiling :) 
Here's the after of this area one more time....and kind of the before too since this will all be changing with the walls in the coming months :) 
These floors are interesting too. They look dirty, but they aren't. They have a mix of grey in with the brown that tend to reflect the light. They are beautiful and have a great mix of colors which easily match greys and beiges. 

The next project I'll be sharing in here is a HUGE one! It made all the difference in her house. I'll be sharing that with you next week! 

Pin for later:


Disclosure of Material Connection: Some of the links in the post above are “affiliate links.” This means if you click on the link and purchase the item, I will receive an affiliate commission. Regardless, I only recommend products or services I use personally and believe will add value to my readers. I am disclosing this in accordance with the Federal Trade Commission’s 16 CFR, Part 255: “Guides Concerning the Use of Endorsements and Testimonials in Advertising.”